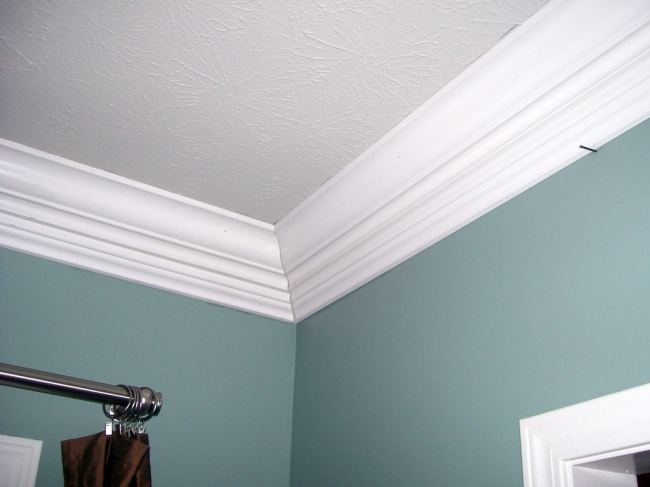
If you are doing this for the first time, it might present you with a challenge. Crown moldings come with many different angles which can be very baffling, when you are cutting the outside and inside corners. Crown moldings can be installed in various angles such as on rounded corners or as blocks. All of these can give you a tough time, if you do not have a fair idea about how to go about it. The process described below will be of help for you while installing Eco-friendly crown molding corners.

Things that you will need for installation of crown molding corners:
1. Measuring tape
2. Miter saw
3. Nail gun
4. Paintable caulk
5. Pencil
6. Crown molding
Instructions for installation of crown molding corners
1. Start with measuring. Take your measuring tape and measure the wall where the crown molding which stretches to the inside corner is placed. Take the measurement form the end of the last piece to the inside corner of the wall. Take at least two measurements so that you do not go wrong with it. You may need help with this.
2. Shift the measurements to the molding. Mark the molding according to the measurement that you have taken of the wall. Mark the molding with a pencil lightly. You will have to make sure that the measurements are accurate. Check twice to ensure this.
3. Use the miter saw. After you have marked the measurements on the molding, set a miter saw to the required angle. After this, place the molding on the miter saw in such a way that the edge that presses against the wall after installation, sits on the table of the saw. The fence of the miter saw should be pressed against the bottom of the crown molding. While you are doing this, make sure that you are concentrating on your work without any other distractions.
4. Start cutting the molding. Once you have the molding in its place and the miter saw set at the right angle, cut the molding with the miter saw. Once you have cut the molding using the miter saw, you will find that the top and the bottom of the molding do not have much of a difference. This will help you install the molding in the the inside corner of the wall. You can take some precautions before cutting the molding. Wear a leather glove for safety purposes. Lay a paper on the floor so that you can collect the dust created from cutting the molding with the miter saw. You can also vacuum the dust, if it seems necessary.
5. Place the molding. After you have cut the molding to the right side, place it against the wall and see whether it fits perfectly. Seek help from someone while you are doing this. Your partner can also help by holding the molding in its place while you go back some distance and check whether it is perfectly positioned.
6. Use a nail gun. Take a mail gun and install the molding into its position.
7. Install the other side. To install the other side of the crown molding, repeat the above described process again.
8. Apply painted caulk. Apply caulk on the seams and the corners of the crown molding. Let the molding dry completely and then paint or stain the caulk. Make sure that you purchase caulk that is paintable.
This installation process will involve a lot of materials which are not very safe. You will also need to mount a ladder quite often. If you do not have a very sturdy ladder than borrow one but refrain from using a wobbly ladder. Hire a help, if needed as this is not quite easy, if you are doing it for the very first time. You can discuss the installation process with someone who has done it quite a few times. This discussion will help you rule out confusions, if you happen to have any. Consult some manual guides, if needed. The materials needed to install the crown molding are easily available in nearby hardware stores. They can also be purchased online.