
The goodness of a solar food dehydrator is being identified by people with increasing concern for healthy living and easy access to unavailable food at all times. Solar power enters by means of the glass top of a timber dehydrator box. Then the food is dried by the heat confined inside the box. An absorber plate may also be kept in the dehydrator, which also heats the food items that regulate air through an opening underneath the dryer. The air then leaves through an opening at the top.
Wetness is taken away along with the hot air, as the food dehydrates. Since, good quality fruits and vegetables are seasonal we would have save them for future use. Drying is an excellent method of food preservation that preserves a high level of taste and nutrients too. Constructing our own solar powered food dehydrator of whatever size we require is a fun project that can be done by anyone. Below are the steps involved in building our own solar dehydrator.
Difficulty level: Easy
Time required: 2 to 3 hours (based on the size of solar dehydrator)
Resources required:
1) Timber or cardboard boxes
2) Paint (preferably black)
3) Glass top
4) Wooden piece
5) Aluminum sheets
Estimated Cost: Approximately $10(for a mini solar powered food dehydrator)
Instructions
1) Pierce holes in a good quality wooden door that is to be fitted to the box dyed with black paint. This assists in absorbing huge amount of heat from the solar power.
2) Set up light over the wooden piece edges in order to safeguard the skin. Support the ledge inside the black box.
3) Cut the wooden pieces to suit the measurements of the black box.
4) The next step is to spread the new aluminum blind in its appropriate place.
5) See that the closure is kept open whilst filling and removing the food items from the dehydrator. This is for safety purposes.
6) Place aluminum blinds at the upper and lower parts of the box so that it permits ventilation and keeps the pests and birds from entering the dehydrator.
7) Attach roller legs for the dehydrator. This will help in transporting the food dehydrator from one place to the other, since the wooden piece fitted may weigh a lot.
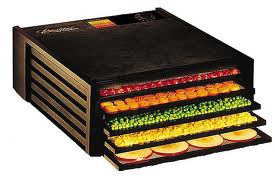
8) Place the food on top of food preservable silicone sweltering sheets. Parchment paper can also be used instead of silicone sheets and it lets enhanced flow of air.
9) Make the handle of the dehydrator using wood. The wood does not captivate heat and aids in handling the dehydrator with ease.
10) When the dehydrator is assembled place it in a position facing the sun.
11) Then test the food dehydrator for optimum aridness.
12) Test a handful by cooling for a few minutes before deciding if the fruit is done.
Frequently asked questions
How can people living in humid places make good use of the less solar power using solar powered food dehydrator?
One can choose the type of foods for dehydration that are appropriate to the season. It is sensible to avoid dehydrating long-term dehydration food since it would not be effective in humid places.
Is direct solar application more effective than turning solar into energy stored in a battery?
Solar energy stored in a battery is inefficient, but still practical. But direct solar power is very efficient and can dehydrate more effectively.
Can freezer saved food items be as good as solar dehydrated food items?
Freezing may be convenient method for preservation. But freezers require a lot of electricity. Also food items can be stored only for about six months.
What are the disadvantages of electric food dryers?
Electric food dryers cause a lot of noise, heat and odors. Electric dryers can additionally attract ants and other pests. The electricity used for this purpose is based on the load placed in the dryer.
Quick tips
1) Build a solar dehydrator that fits the specific space, climate, and food needs.
2) Cool the food items before placing it in the dehydrator, because this gives a good texture to the food items.
3) Unbleached parchment paper can be cleaned and used again.
4) Dehydrated fruits can be considered dried, only when no moisture can be squeezed from it when it is cut. Check if the fruits are flexible and tough.
5) Do not dry the fruit too much as they become unfit to eat.
6) Vegetables that are dehydrated should be dry and brittle.
Things to watch out for
1) Place the thermometer inside the glass of the solar dehydrator. Check the temperature every two hours. Keep the door open if the temperature is too high. If the temperature is cool, keep a towel on the top vent so that the temperature is raised.
2) Summer time is best to dehydrate foods to preserve them, since there is ample amount of solar energy available at that time.
3) Place the foods to be dehydrated onto a food-grade silicone baking sheet, so that the heat gets distributed to all the places.
4) Scientific investigation has proved that the food heated with temperature no higher than the sun would retain its nutritional integrity and life force.
5) A food dehydrator placed in the rooftop works by using black color to draw in the sun’s heat through a clear barrier. This heat then warms the air that enters the dehydrator, which rises and is directed through screens with food on them.